How to Change the Sort Order of Charges on My Custom Job Ticket

How to Change the Sort Order of Charges on My Custom Job Ticket
(Send me an email for a free Classic Report Writer report of my job ticket)

DISCLAIMER:
Only do this if you feel comfortable making these changes and that it will be an overall benefit.

*** Warning!! ***
Before you begin, make a complete backup of your PrintSmith folder, and, optionally, copy one to your desktop for easy retrieval.

1. First, Re-arrange your charge command titles in the order that you want.
For us, the 10 command titles appear in this order:

  1. PrePress
  2. Marketing/Internet
  3. Print Production
  4. Bindery
  5. Outsourcing
  6. Mailing
  7. Shipping
  8. Discounts
  9. Empty
  10. Don’t Use: Save for Later

2. Second, Open your job ticket in report writer:
Select the Data Source (Filing Cabinet Icon) and check the box that says
“Group Charges” and the box that says “Use Charge Command List”, click OK

3. At the bottom of your ticket there is a field called “Charge_Section_Title”
Open that field, then open the formula (red sigma).
Make sure the “Special” tab is selected, then choose “Charge Command Title (1 to 10)”,
Click OK

Summary Part for Charges List ID

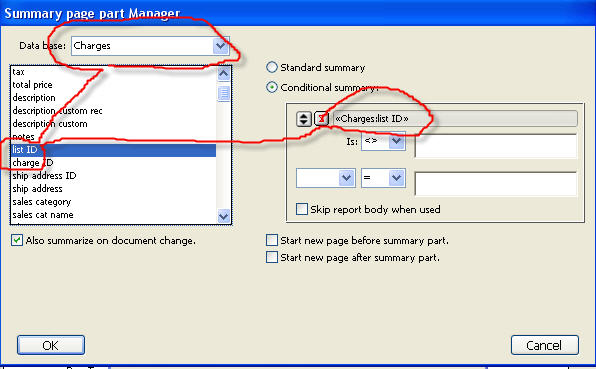
4. Leading Summary for the Charges has to be changed.

  1. Click on the Page Part Manager
  2. Highlight the 7th Leading Summary (which probably says “Charges: recordtype”)
  3. Double click on it
  4. On the left window, select the field named “list ID”
  5. Click in the Up/Down arrow icon to the left of the Red Sigma, and select the field called “list ID” from the “Charges” menu.
  6. Click OK, and OK and save.

5. Reset Command Titles Checkbox for Job Task List

  1. Open the Charge Definitions and collapse the Charge Commands so you can see all 10
  2. Click on the first one, and Uncheck the box on the right for Add Command to Job Task List
  3. Repeat the unchecking for all 10 Commands
  4. Go to File > Exit to Save these Changes
  5. Re-Open PrintSmith and go back to the Charge Definitions
  6. Now you need to check the box for the Command Titles you want to see in the job window
  7. Click on the first one, and Check the box on the right for Add Command to Job Task List
  8. Repeat the checking for each Command you want to see
  9. Go to File > Exit to Save these Changes
  10. Re-Open PrintSmith

Now, create a new job with lots of charges, preferably one from each of the commands and test the printout. If it does not work, feel free to send me an email through the Contact Us page.
Otherwise, you may have to revert back to your backup.

Good luck!!

Fiscal Year End Closeout Procedures

Fiscal Year End Closeout Procedures

(Hint: Make a folder called PrintSmith Year End 20XX to store the PDF’s & Backup you will be making.)

Here is the short list “cheat sheet”:

  1. Closeout
  2. Monthly Closeout
  3. Sales Summary (last 12 months, PDF)
  4. Aging Report (PDF)
  5. Sales Ranking Report (PDF)
  6. Backup, Label & Store (in a cool dry place, off site)
  7. Add’l Reports, if desired

Here is the detailed list:

On your last business day, perform a Closeout.

Once complete, perform a Monthly Closeout.

Then, Go to Reports > Monthly Sales.

Perform a year end composite report of every monthly closeout for 20XX by highlighting the months from January – December, (Or, the months of your Fiscal Year.) Choose the Sales Summary from the pull down menu and click Select.

Print the report. This is your Year End report. (Make a PDF)

Then run an AR Report (Aging Report) and be sure to print it and SAVE it. (Make a PDF too!) (The saved file will be stored in your archives folder for reference should you need it later.)

Then, Run the Ranking Report by going to Reports > Customer List.

Report Format > Sales Rank Year, Sort by > Sales Rank Year.

Save the Ranking list. (Make a PDF)

(Tip: The Ranking Report includes Postage so it is NOT completely

accurate!!)

In addition, with versions 7.2 & beyond you can now run Add’l Ranking reports. Go to Reports > Account Ranking to run reports like: Number of Orders, Sales by Sales Category, and Balance.

Quit out of PrintSmith and perform a Backup of the entire PrintSmith Folder.

Label and store this Backup separate from any backups done during the normal year. Especially since version 8.0 & beyond has a built in Backup Manager.

A good idea is to backup to a CD and label it 20XX PrintSmith Year End.

This also a good time to run Sales Analysis Report Writer reports for the year. (Make PDF’s)

Resetting the System to Go Live

For some reason I can no longer find these instructions in the manual, so I asked PrintSmith Service to give me the instructions:

To prepare to go live and reset your system follow the instructions below:
(This will keep your Customers, Press and Digital/Copier definitions, and Charge definitions.)

1. Back up the entire PrintSmith Folder.
2. Open the Data Folder and select the following the following files for replacement later:
Customers,
Customer Index,
Customer Notes,
Customer Log,
Contacts,
Contact Index,
Employee, and
Employee IDX.
(The Employee files are only necessary if you are at 7.1.x or greater and have the Tracker module)
3. Drag these files to the desktop.
4. Delete the Data Folder
5. Rerun the PS Installer from the CD.
6. Place the files from Step 2, which are on the Desktop, into the new Data Folder of the PrintSmith Folder. Replace the files in the Data folder.
7. Launch PS and first rebuild Acct History. Hold down the Option or Alt and Shift keys and select Reports > Account History. Click OK.
8. Verify your customer and pricing are installed in this new version. From the AR menu, select Verify All Balances and Verify Receivable Balance to make sure they are set to zero. If you are asked to fix any balances, click on Fix.

That should do it.

New Pricing Import / Export Feature

There is a new Pricing Export/Import Feature that you can use.
It works for Presses, Digital, and Stocks.

Go to your Master, go to Preferences > System > Behavior

There is a new checkbox for Enable Pricing System Import / Export features.
(You can do stocks from a workstation too!)
Example:

Go to Pricing > Stock Definitions.

At the top of the window there is an Export button, Export a selection or all. It will create an XML file.

Open up another PrintSmith serial # or the Demo.
Go to File > Import
Browse for the XML export file you just created.
Choose:
Add
Update
OR
Update and Add

Click the Done button.

Voila!!!

Getting Started for Newbies

Use a logical order like you would when you enter an estimate: 1st is the Customer, then the Paper, then the method(Press/Copier), then the Charges: Prep, Bind, Mail.

Assuming that you have already entered your Preferences and filled in the Tables in the Table Editor, this is what I would do:

1. Import and/or Enter your Customers:
Most likely you have your customers in a mailing list or your accounting program. Import them in and then have your CSR’s start entering things like Email addresses (be sure to use the fixed email field = the long one). Enter multiple Contacts etc. This is easy stuff for anyone. This will then allow you to start creating estimates for specific customers.

2. Enter your Top 50 most used Stock Definitions:
Use the ones that come with the system and modify those. No need to start from scratch. Then when you have one that is similar to one you already have just open that one and hit the New button. This will save you trouble of typing repetitive info. Be sure to include a Vendor and the Stock #. This will be important later when you want to increase/change prices. Don’t worry about importing a price book yet.

3. Create your Press Definitions:
Assuming you have already calculated your BHR’s for your company using Ron Teller’s spreadsheet. Keep it simple with 1 definition for each press and then add from there.
Keep it simple at first: Labor Rate, One Average Speed, (Not the advertised fastest speed, but the average speed that your operator actually uses. Then slow it down by 10%.) As you gain more experience, you can create additional definitions for different types and sizes of paper.

4. Create your Copier/Digital Definitions:
You will need the costs from your equipment for at least the last 6 months. I prefer to use the Average Usage per month to calculate the Machine Cost per copy. Enter your Lease, Maintenance, Clicks, Toner, etc. Labor is tricky because most shops don’t have a dedicated employee running a digital machine like our shop does. I don’t have time to type out how to figure that, but I do have a couple Excel Spreadsheets that I use. Email me privately if you are interested.

Now you need to create a Matrix. A matrix is what you are going to charge and you have create that yourself, it is not calculated for you. I usually fill it out from the bottom to the top to be sure I don’t go too low.
Most shops use the Total of Copies method with a Marked Up Stock Cost. This way you don’t have to worry about what kind of paper you’re using.
Here is a link to a previous post about setup:
http://forums.efi.com/showthread.php?t=1629

5. Create your Charge Prices:
Start with Prepress because that is the easiest and is mostly based on time or plates. The ones that ship with the with system are a good start and you just need to modify the Cost and the Price. The cost is important because that is where you enter your Actual Cost with your BHR’s and your Actual Speeds. These are then used to calculate Estimated Times.

Next, enter your Bindery Charges. These can be a little more challenging since they mostly use the Job Aware method which means that you have to choose what factors PS must use to calculate the price: Ordered vs. Press Qty; Colors vs. Sides; Sheets vs. Sigs; x Up or / Up; There are some great examples that ship with the system.

Keep in mind that you can also create Rate Lists or Price Lists based on Qty so you can have a Sliding Scale.

6. Start Using PrintSmith:
The only way to learn how the things you have setup work is to test it by entering the current estimates and invoices that you currently have. I agree with Jeff that it is better to use Line Item Discounts/Adjustments to get the prices you want instead of Overrides. I got bit today by an Override but it was in our favor, so the customer didn’t mind when I told them their price was lower. You are going to have a lot of Legacy Pricing issues at first until you tweak your system. “We charged $500 last year but PrintSmith says the price should be $600.”

Don’t worry about messing anything up. Before you Go Live, you can get rid of any of the Invoices or Billing that you only did for testing.

Lastly, you will never be “done” setting up. Welcome to Kaizen, what the Japanese call Continuous Improvement.

Good luck!

Export Stocks, Make Changes, then Import Stocks back in

1. Do a backup first. Do it after hours or on the weekend when no one else is logged in. (Don’t do it during business hours.)

2. Try it with a small batch of about 10 stocks first so you get an idea of what results you will get. Export the stocks using the attached report.

3. Make your changes in Excel and save as CSV. Import them back into PS with the Import Stock Catalog feature. Use the GENERIC interpreter. PS will only accept a (.CSV) Comma Separated File

4. PS will only recognize stocks with a Stock # (No stock # = no luck)

5. If you mess it up you can always revert to your backup.

Fiscal Year End Closeout Procedure

The end of the fiscal year (for us) is quickly approaching. To ensure a proper year-end for
PrintSmith, please follow the below guidelines.

On your last business day, perform a Closeout.
Once complete, perform a Monthly Closeout.

Then, Go to Reports > Monthly Sales.
Perform a year end composite report of every monthly closeout for 20XX by highlighting the months from January – December, (Or, the months of your Fiscal Year.)

Choose the Sales Summary from the pull down menu and click Select.
Print the report. This is your Year End report.

Then run an AR Report (Aging Report) and be sure to print it and SAVE it.
(The saved file will be stored in your archives folder for reference should you need it later.)

Then, Run the Ranking Report by going to Reports > Customer List.
Report Format > Sales Rank Year, Sort by > Sales Rank Year.
Save the Ranking list.

In addition, with versions 7.2 and beyond you can now run add’l Ranking reports. Go to Reports > Account Ranking to run reports like: Number of Orders, Sales by Sales Category, and Balance.

Quit out of PrintSmith and perform a backup of the entire PrintSmith Folder.
Label and store this backup separate from any backups done during the normal year. Especially since version 8.0 has a built in Backup Manager. A good idea is to backup to a CD and label it 20XX PrintSmith Year End Snapshot.

This also a good time to run Sales Analysis Report Writer reports for the year.

_uacct = “UA-2933729-1”; urchinTracker();

What is a Starting Record Number?

starting-record-numbers-by.jpg

Take a close look at the chart above. It shows the four main databases within PrintSmith: Charges, History, Invoices, and Jobs and the Starting Record Number for each year we since we bought PrintSmith. These four databases will be used in almost every report you create. However, most reports only need a small chunk of data, so I created this spreadsheet to help me run reports faster. (Please note that these numbers apply to our shop only, not yours!!)

Speed is where the Starting Record Number becomes important. Suppose I only need the data from the History database for 2006. The report will run faster by choosing a Starting Record Number of 62,846. This ensures that I will only be using data created from 2006 forward, thus eliminating 62,845 records from the processing of my report!! (Otherwise, PrintSmith goes all the way back to 1998 and starts processing from Zero!!)

Keep in mind that these record numbers have nothing to do with your Invoice numbers, but are simply a consecutive number assigned to each record. I recommend that you create a chart like this for your company by using the Downloader Browse function to find the record numbers for each of these databases for each year. January is a great time to write down the numbers for 2007! It will help you to speed up your reports and save time.

Year End Procedures & Closeout

The end of the year is quickly approaching. To ensure a proper year-end for
PrintSmith, please follow the below guidelines.

On your last business day, perform a Closeout.
Once complete, perform a Monthly Closeout.

Then, Go to Reports > Monthly Sales.
Perform a year end composite report of every monthly
closeout for 2006 by highlighting the months from January – December,
Choose the Sales Summary from the pull down menu and click Select.
Print the report. This is your Year End report.

Then, Run the Ranking Report by going to Reports > Customer List.
Report Format > Sales Rank Year, Sort by > Sales Rank Year.
Save the Ranking list.

In addition, with version 7.2.x you can now run add’l Ranking reports. Go to Reports > Account Ranking to run reports like: Number of Orders, Sales by Sales Category, and Balance.

Then run an AR Report (aging report) and be sure to print it and SAVE it.
(The saved file will be stored in your archives folder for reference should you need it later.)

Quit out of PrintSmith and perform a backup of the entire PrintSmith Folder.
Label and store this backup separate from any backups done during the normal
year. A good idea is to backup to a CD and label it 2006 PrintSmith Year End Snapshot.

Hopefully I didn’t leave anything out!!

Who Changed the Tracking Location?

Have you ever had the location change on an invoice without knowing who did it or when?

You can check when the Location changed by clicking on the Status button on Pending List. It gives you a Date & Time Stamp.

If you really want to know who it is, there is a canned report that tracks the Locations and the person who is logged in when they are changed. Just send me an email and I will send it to you.

Or you could use the Downloader browse function if you don’t feel like running a report.